- Updated on November 1, 2020
![]() By Dr. Artour Rakhimov, Alternative Health Educator and Author
By Dr. Artour Rakhimov, Alternative Health Educator and Author
- Medically Reviewed by Naziliya Rakhimova, MD
How to Do the Buteyko Emergency Procedure (EP Shallow):
Edited by J diFeliciantonio on February 21, 2020
Module 4-A: Shallow Breathing (Reduced Breathing) Exercise
 For better body oxygenation, instead of a frequent and heavy breathing pattern, you need one that is slower and shallower. “Shallow breathing,” “shallow breath,” or “reduced breathing,” as it’s known, is the main breathing exercise of the Buteyko Method.
Very heavy breathing and corresponding low body oxygenation are present when people: 1) take large inhalations; 2) forcefully exhale air from the lungs, instead simply relaxing breathing muscles (to produce a quiet, natural exhale); and 3) breathe using the chest, not the diaphragm.
Naturally then, for optimal oxygenation, Dr. Buteyko advised people to do the opposite: Take smaller inhalations, relax all breathing muscles for natural exhalations, and breathe with the tummy. Buteyko also helped people with health conditions (from angina to asthma) to reduce or eliminate their symptoms by altering their breathing patterns. When done before or during a health crisis (e.g., an asthma attack), he called this reduction of breathing the “Emergency Procedure.”
Typically, Buteyko practitioners divide automatic breathing patterns into four groups. If you are not familiar with this notion, it’s important that you review this page before proceeding: “Four regular breathing patterns and corresponding body-oxygen levels.”
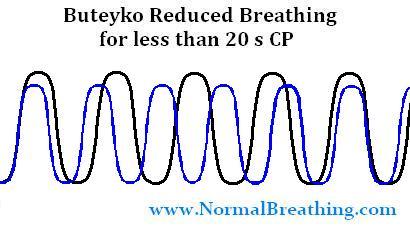
To learn to breathe less, Dr. Buteyko created an exercise called “reduced breathing.” As shown in the image below, which models the breathing of a student with a Control Pause of less than 20 seconds, the line with higher amplitude represents the initial breathing pattern, while the lower-amplitude line represents a reduced- or shallow-breathing pattern.

Note that when a student has a body-oxygen test of less than 20 secs., the number of breaths per minute during a reduced-breathing session (while still maintaining light air hunger) will increase. This is perfectly okay.
Beginners with CP < 20 can practice the following exercise:
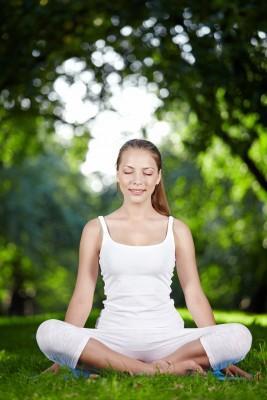
 1. Find a comfortable position that allows you to sit with a straight spine. Sit on the edge of a chair with good posture. Or, if its comfortable for you, sit in a yogic posture, either with legs crossed (e.g., siddhasana) or under the body (i.e., vajrasana). What’s most important is that the spine is comfortably erect, and you are able to relax all muscles. Before beginning reduced breathing, relax completely. Such relaxation will normally produce a quiet, spontaneous exhalation.
2. After this exhalation is complete, pinch your nose with two fingers and hold your breath for about 1 to 2 seconds.
3. As the feeling of air hunger at the end of this breath hold will not be strong, on the next inhalation, you’ll be able to take in less air than you did before — approximately 80% to 90% of your normal inhalation. In other words, “breathe less,” but use mainly (ideally, only) the tummy.
4. On all exhalations, just relax. There is no need to push air out of the lungs. Focus on keeping all breathing muscles, including the chest, shoulders, and diaphragm muscles, completely relaxed.
5. Again, inhale a small amount of air, so that you continuously feel a light level of air hunger. (Imagine you’re taking a brisk walk while talking to a friend; that’s the level of air hunger you should feel.)
6. And just relax the whole body.
 7. Continue to breathe in such a shallow, relaxed manner, with constant air hunger, for about 1 minute.
Repeat again and again this 1-minute cycle: short breath hold (1 to 2 secs.), followed by smaller inhalations and relaxation of all muscles on exhalations. In other words, after every minute of reduced breathing, you do short breath holds (1-2 s) and then another minute of RB.
Your breathing session will look like this:
– Breath hold (1-2 s) – Reduced breathing (1 min) –
– BH (1-2 s) – RB (1 min) –
– BH (1-2 s) – RB (1 min) –
– BH (1-2 s) – RB (1 min) – End.
About your medication
If you have a medical condition, and feel that you must take medication to alleviate an attack, try using 1/3 of your standard dose. After taking the medication, continue the Emergency Procedure (reduced breathing). Monitor the severity of your symptoms. If symptoms are not improving and you’re not able to stop the attack (e.g., angina pectoris), again take 1/3 of your usual dose. Continue once again the Emergency Procedure. Ensure to maintain air hunger throughout. Russian medical doctors and practitioners found that most patients, when practicing properly, could eliminate their symptoms in 1 to 5 minutes (Buteyko, 1977).
How to better relax: additional practical recommendations
 When you are not sure if your chest, shoulders, neck, or jaw muscles are relaxed, try tensing them maximally (or near maximally) for 1 to 2 secs. and then promptly relaxing them. This process can be done with a whole muscle area, or if too difficult, moving through separate muscular groups one by one.
While still tensing and relaxing, visualize the following as clearly and vividly as possible: your body (parts) during tensing like a steel spring, which is hard and strong, and while relaxing, like large soft dough, or a jellyfish, or a CO2 molecule floating above the ocean. You may use any images, of course, that work for you. E.g., during tensing, try seeing the body like an over-inflated, water-filled balloon, resilient and firm, which suddenly loses pressure and becomes soft and shapeless, filled with air during relaxation.
 Muscular tension (if any) during reduced breathing exercises should only be experienced in the area of the diaphragm. As such, it can help to visualize all tension, stress, and pressure sliding down from the head, neck, shoulders, and chest, descending into the the diaphragm.
You can also hand massage those areas that are frequently tight (chest, shoulders, neck, jaws). If you have a relative or friend around, they can also help by giving you a massage.
During the Emergency Procedure, relaxation of the diaphragm and skeletal muscles is only possible if the amount of air in the lungs is near the physiological normal volume. Such a lung state is achieved when people suddenly lose consciousness, or are properly relaxed. (Better to relax!) Having too much air in the lungs at rest is undesirable, as respiratory muscles will tighten and tense.
Remember, Buteyko breathing exercises allow for maximum time spent in a state of relaxation for all muscles in the body. This is one of the advantages of “reduced breathing” (i.e., “shallow breathing” or “shallow breath”). In fact, with time as people practice, they begin to enjoy breathing less, due to the pleasant emotional sensations and mental quiet it brings.
Spanish version of this page: Detenga un ataque cardíaco, un infarto, asma, convulsiones.

